
Driveway Installation Best Products (and Technologies) for Lifetime Value
Natural stone paver driveways are a thing of beauty, a real estate highlight, and a feat of engineering. They increase property values, up the curb appeal, and boost resale prices. So, what’s the best way to protect that investment and maintain its physical appeal? Let’s start at the basics, which means ensuring the natural stone driveway installation is done correctly.
There are two options for natural stone paver driveway installation.
- ‘Dry set’
- ‘Wet set’
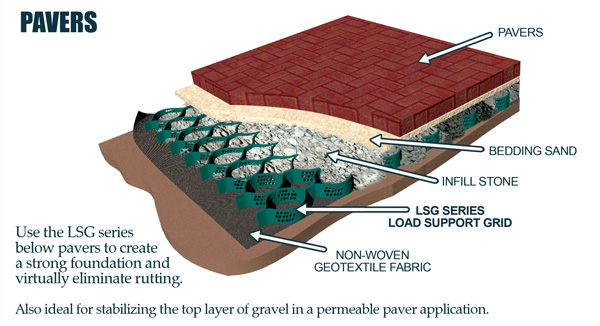
And, at Gothicstone, we suggest all ‘dry set’ and ‘wet set’ installations include a cellular confinement system (CCS) underneath for maximum longevity and lifetime value.
Insider notes: ‘wet set’ driveway installation with natural stone pavers
An issue with ‘wet set’ (poured concrete slab substrate) particularly in climates that have a lot of freeze-thaw cycling, is that concrete slabs are used as the sub-base/substrate and often will crack. It’s often not a question of “if” the underlying concrete slab will crack, it’s “when” it will crack. And a cracked concrete slab will commonly transfer the crack(s) to the adhered surface stone or any material on top, such as concrete pavers, for that matter. The reality is very few contractors are willing to put the effort into making a slab that won’t crack because it takes extra work and expense. Utilizing rebar, a geo cellular confinement system, and a ‘separation membrane’ (such as Schluter®-DITRA & DITRA-XL) will mitigate the possibility of failure, as described below.
Geo Cellular Confinement System (CCS) to the rescue: Why implement in a ‘wet set’ driveway application?
Some people think the cellular confinement system isn’t needed under a large concrete slab. But we disagree. The fact is the minimal extra expense will all but guarantee that you will never have slab cracking. Water is going to get underneath the concrete slab and during freezing, it will expand. The cellular confinement system holds everything in place minimizing movement resulting from freezing and thawing environments.
Steps to installing a ‘wet set’ long-lasting driveway with a cellular confinement system:
To recap, if you want your installation to last a long time, follow these 9 steps:
- Excavation with appropriate drainage considerations to mitigate water pooling underneath.
- Installation of geotextile to prevent gravel from sinking into the soil below it.
- Installation of the cellular confinement system following manufacturer’s best practices.
- Fill the confinement system utilizing only clean (washed and graded) gravel. We strongly advise against using ‘modified/unwashed’ gravel mix.
- Installation of a top layer of geotextile on top of the gravel.
- Installation of rebar grid on the top of the gravel (preferably epoxy coated or ‘high-tech steel alternative’ composite rebar to avoid the risk of rust-causing future failure).
- Pour a fiber-reinforced concrete slab. It is imperative to follow the local code regarding the implementation of expansion joints.
- To ensure longevity, an extra step we recommend is to install a separation membrane such as Schluter®-DITRA & DITRA-XL on top of the concrete slab to mitigate cracks transferring through to the surface stone.
- Professionally install the appropriate natural stone including grout lines (and expansion joints where necessary) to enable expansion and contraction. This is imperative in extreme weather conditions. In a perfect world, ½” thin natural stone can be used when all the above steps are adhered to with precision. Otherwise, we would recommend the 1 ¼” standard thickness for exterior applications.
In conclusion, there are redundancies in the above best practices instructions. There is almost zero chance of failure if all these steps are completed, and the resulting driveway should last a lifetime.
Insider notes: ‘dry set’ driveway installation with natural stone pavers
‘Dry set’ installation is the ideal method for driveway stone pavers. It avoids excessive movement of the stone due to heaving in colder climates. Also, stress from an expansion of the stone in hot climates. These unwanted issues are inherent in poured concrete slab systems. ‘Dry set’ installation is an environmentally sustainable alternative that allows water to pass through it rather than create problematic water runoff.
For the safest approach, it’s best to select natural stone pavers of smaller sizes. When working with smaller pieces, such as 4”x4”, 4”x6”, or even 6”x6” cobblestones, use a ‘dry set’ application. But if your customer wants something different than the classic cobblestone 4”x4” granite, limestone, or porphyry block, the key is to consider the flexural stress on the stone. If the stone surface is longer than 6 inches in any one direction, then a strong (high ‘flexural strength’) material is optimal, particularly when considering a ‘dry set’ application. Avoid natural stones prone to having natural fissures or clefting.
Large format natural stone pavers in a driveway installation
Large format pavers can be successfully installed if the installation is done properly. You can install 12”x12”x1¼”, 16”x16”x1¼”, 8”x16”x1¼” or larger if it is installed correctly. But that’s a BIG “if”. Many contractors/masons rely too heavily on laborers to do the installations, emphasizing speed over quality. This isn’t a good idea. A small void or a “pea under the mattress” can cause failure.
Geo Cellular Confinement System (CCS) to the rescue
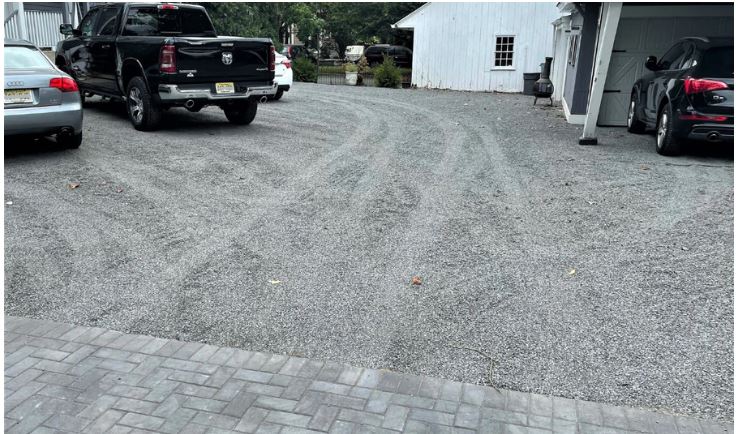
To mitigate shifting and cracking, install a cellular confinement system. Gothicstone recommends a cellular confinement system (CCS) under any base. With driveways, it’s almost imperative due to tire track “rutting” to use a CCS. For example, if you have a sand or dirt driveway, ruts inevitably occur over time. But it also happens with blacktop driveways or any driveway where you have constant stress and load on two narrow tire tracks. The vehicle load will compress the ‘track’ area, whereas a CCS can keep the substrate from spreading out. This method prevents stress on the tracks from making ruts in your installation, and thus pieces from failing. Because when the ruts happen, there’s uneven compression on the pieces. It’s the unevenness of the load where problems like this occur.
Small 4”x4”x4” cubes/pavers typically won’t break, which is why people typically use this size of material, but they will be susceptible to rutting and shifting. Often people want to use a larger format driveway stone. If so, a ‘dry set’ and a cellular confinement system are the approaches to use.
Ruts and cracks can be avoided
The larger pieces will help in that they won’t rut as readily, however, they may crack. Whereas small driveway stone pieces will allow the material to “sink down” into the ruts without breaking. But they’ll allow the ruts to occur more easily. Plus, more water is washing in between the joint areas because you have more joint areas.
If you have a 4”x4” compared to a 16”x16”, you’re going to have about 1000% more joint area with a 4”x4” installation. That’s an incredibly exponential amount of joint area because in a 16”x16” area, you will have 16 pieces of 4”x4” material (4 in one direction and 4 in the other direction) and then all those joint lines in between where the water will be entering and then allowing for either washout or heaving underneath it.
So, the smaller driveway stone pavers do allow for more movement to happen but, eventually, they may cause ruts unless you use a cellular confinement system to keep everything underneath in place.
Keep in mind that vehicular weight will be on the pathway of the vehicle tires; that is where the bulk of the load or stress will go.
Steps to installing a ‘dry set’ long-lasting driveway with a cellular confinement system:
To recap, if you want your installation to last a long time, follow these 8 steps:
- Excavation with appropriate drainage considerations to mitigate water pooling underneath.
- Installation of geotextile to prevent gravel from sinking into the soil below it.
- Installation of the cellular confinement system following manufacturer’s best practices.
- Fill the confinement system utilizing only clean (washed and graded) gravel. We strongly advise against using ‘modified/unwashed’ gravel mix.
- Follow local code requirements regarding the height/quantity of crushed stone/gravel required in your geographic area.
- It’s considered best practice to compact every two inches of height when applying the gravel.
- Installation of a top layer of geotextile on top of the gravel.
- Installation and compaction of screenings/’fines’ (concrete dust, sand, or small/fine gravel)
- Professionally install and compact the appropriate natural stone pavers. Where small grout lines are open between the pavers, sand or polymeric sand can be swept between the joints.
- To retain the beauty of the stone, you should use an impregnating stone sealer using a color enhancing impregnating stone sealer, so it keeps the stone looking new. If you want the stone to age naturally, you don’t have to use any stone sealer at all. In any case, sealing in a ‘dry set’ application is not necessary. Never use a ‘topical’ stone sealer (non-impregnating).
5 design approaches using natural stone pavers:
- Creating a “deco” look. Use smaller pieces that can manage the load in the heavy traffic areas and install the larger stone along the sides.
- Placing smaller format material at apron entrances of driveways. The entrance apron, where vehicles turn in off the main road, typically takes an enormous impact as they swing into the driveway. In most of the United States, when you approach a driveway, there will be a bit of a bump or a swale causing impact. So, on the apron entrance, from the road to the driveway, consider using a smaller format stone. The smaller format driveway stone mitigates the impact of flexural stress, while at the same time smoothing the sloping transition to the street.
- Mixing and matching alternating sizes to provide attractive applications. Smaller driveway stone pieces on the apron can be cut from the same blocks of stone as the rest of the project applications. Whether it’s a long driveway, walkway, or pathway leading up to a patio or pool, for example, the entire project stone can match no matter the size or thickness of the material.
- Picking the appropriate material if you select larger format driveway stone pieces. Gothicstone™ SEAHAZEtm limestone is extremely strong, has high compressive strength, and high flexural strength.
- Choosing 4”x4”x4” cubes is not necessary. It’s not necessary to go that thick, however, with carbon footprint, shipping costs, and other green initiatives being an increasingly important consideration, a 4”-thick paver is going to double the shipping cost of a 2”- thick paver. From both a cost-effective value engineering perspective and a carbon footprint perspective, a 2”-thick piece gives you a better value and is good for the earth!
Have questions on cellular confinement systems and selecting/specifying natural stone for driveway systems? Contact us.
Other resources that may be helpful in planning your driveway installation:
- DRIVEWAY STONE PAVERS MAKE AN IMPRESSION AND ADD VALUE
- Considerations for specifying natural stone in residential/commercial vehicle applications.
- Why We Recommend Stabilization Grids No Matter the Scale of Your Paver Project.
- Battling Mother Nature
- THE POWER OF GEOCELLS, GEOTEXTILES, AND GEOGRIDS TO BULLETPROOF PAVER INSTALLATIONS
- Cell-Tek Geo Cellular Confinement System
- Rutgard Geo Cellular Confinement System
- https://usenaturalstone.org/the-natural-stone-advantage/
- https://www.jamesrivernurseries.com/the-latest/171-landscaping-and-return-on-investment#:~:text=A%20study%20by%20RealEstate.com,like%20kitchen%20or%20bathroom%20updates